The CMS-1500 form is a crucial aspect of insurance claims and healthcare billing. This red-ink-on-white-paper form has become one of the most important tools in outpatient billing. Everyone involved in insurance claims, whether they are a solo practitioner, a billing manager, or someone tasked with filling it out at a small clinic, needs to understand the CMS-1500 to fill it out accurately. No doubt in this digital era, automation simplifies each operation but still this form retains its importance. That’s why it is important to understand the logic behind the CMS-1500. Let’s discuss in detail what the form is, how it’s used, what a completed version looks like, and step-by-step instructions for getting it right.
What Is the CMS-1500 Claim Form?
In short, the CMS-1500 is the standard claim form used by healthcare providers to bill Medicare and many private insurance carriers for outpatient services.
CMS stands for Centers for Medicare & Medicaid Services and oversees the whole process. The form was developed by the National Uniform Claim Committee (NUCC) and is used for non-institutional providers like physicians, chiropractors, and therapists, etc. Hospitals and other facilities use the UB-04 form.
If you’re billing for office visits, labs, diagnostic tests, or procedures done outside a hospital setting then the CMS-1500 is your preferred form.
Why Is the CMS-1500 So Important?
The major thing that makes CMS-1500 important is that you don’t get paid without it. It plays the biggest role in the provider reimbursement process. This form captures all the necessary details for insurance carriers to process a claim, including patient info, provider info, services rendered, diagnoses, and billing codes. Any misconception here can increase the chances of denials, delays, or no reimbursement at all. That’s why accuracy matters a lot.
CMS-1500 Quick Overview
Before going into a detailed form, let’s see a quick overview of CMS-1500 that will always be helpful to keep a sample CMS-1500 nearby when you’re just learning.
- Box 1: Insurance type, you can check “Medicare” or other box
- Box 2: Patient name like Sara James
- Box 3: Birth date/sex like 01/01/1980 / Female
- Box 4: Insured’s name, same as patient or parent
- Box 21: ICD-10 Codes like E11.9 for Type 2 diabetes
- Box 24D: CPT/HCPCS codes like 99213 for office visit
- Box 24E: Diagnosis pointer
- Box 33: Billing provider info like Name, NPI, address, phone
Who Uses the CMS-1500 Form?
If you don’t know whether this form applies to your practice or not, then let’s see who can typically use it:
- Private practice physicians
- Nurse practitioners
- Physical therapists
- Chiropractors
- Psychologists
- Outpatient clinics
- Laboratories
- DME suppliers
Basically, if you’re offering services in an outpatient setting and billing Medicare or insurance, you’re likely filling out CMS-1500s.
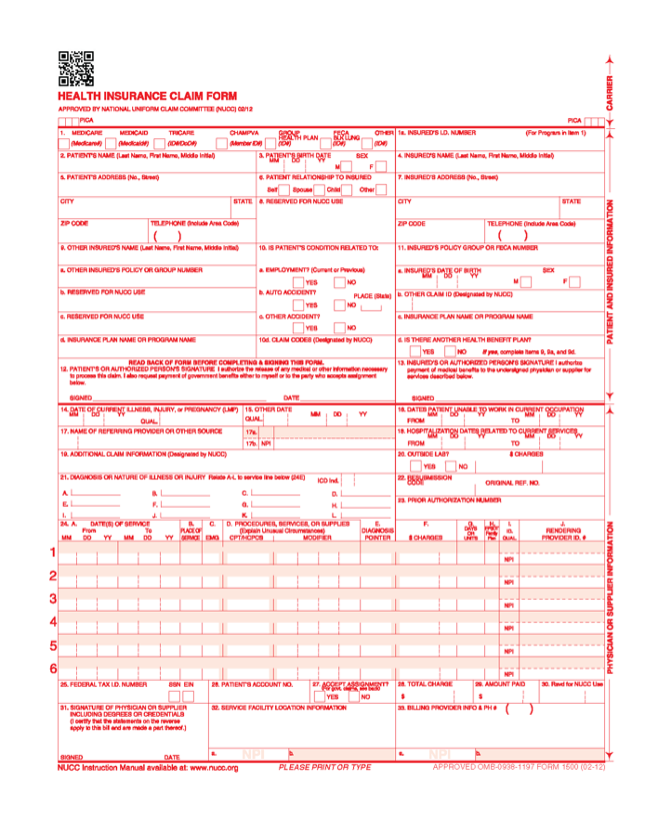
What Does a Completed CMS-1500 Form Look Like?
It’s a white sheet filled with red boxes (that’s important—the red ink is scanned by insurance systems). It’s divided into two main sections:
- Top Half (Boxes 1–13): All about the patient and insurance details.
- Bottom Half (Boxes 14–33): Focused on the provider, diagnosis, procedures, and billing.
A well-filled CMS-1500 is clean, accurate, and complete.
How to Fill Out a CMS-1500 Form
Let’s discuss it box by box. Keep in mind that accuracy is key. Even tiny errors like misspellings or wrong ZIP codes can cause delays or denials.
Section 1: Patient and Insurance Info
Box 1: Check the box for the insurance plan you’re billing (e.g., Medicare, Medicaid, Other).
Box 1a: Enter the insured’s ID number exactly as it appears on the insurance card.
Box 2: Full legal name of the patient that is shown on the patient’s medicare card.
Box 3: Patient’s birth date and gender.
Box 4: Name of the person who holds the insurance (can be the patient or a spouse/parent). If the insured and patient are the same, then mention SAME in the box.
Box 5: Patient’s full address and phone number.
Box 6: Relationship to the insured (self, spouse, child, other).
Box 7: Insured’s address (if different from patient). Complete it when boxes 4, 6, and 11 are completed.
Box 8: Reserved for NUCC use—leave blank.
Box 9 (a-d): If there’s secondary insurance, fill this in. Otherwise, leave a blank or write “none.”
Box 10 (a-c): Checkboxes to indicate if the condition is related to employment, auto accident, or other accident. This is key for liability claims.
Box 11 (a-c): Group number, name of insurance plan, and authorization codes.
Box 12 & 13: Patient’s or authorized person’s signature (can say “Signature on File”) and assignment of benefits.
Section 2: Provider and Billing Info
Box 14: Date of current illness or injury.
Box 15: If the patient has had similar symptoms before, put that date here.
Box 16: Dates the patient was unable to work, if applicable.
Box 17 & 17b: Leave blank in 17a. Referring to the provider’s name and NPI in 17b.
Box 18: Hospitalization dates (if related to this service). Otherwise leave a blank, not required by DME MAC.
Box 19: Additional claim info like Routine foot care or EMG performed.
Box 20: Was lab work done outside? Check “Yes” and enter charges if applicable.
Box 21: ICD-10 diagnosis codes. You can list up to 12.
Box 22: Medicaid resubmission code—only if resubmitting.
Box 23: Authorization or referral number.
Section 3: Service Details
Box 24A: Date(s) of service.
Box 24B: Place of service code (e.g., 11 = Office, 12 = Home).
Box 24C: Emergency? Mark “Y” if yes.
Box 24D: CPT/HCPCS code(s) + modifiers.
Box 24E: Link diagnosis codes from Box 21 using letters (A–L).
Box 24F: Total charges for the procedure(s).
Box 24G: Number of units (e.g., 1 office visit = 1 unit).
Box 24H: EPSDT or family plan info (mostly for Medicaid).
Box 24I & 24J: Provider ID qualifiers and NPI number.
Final Section: Billing Info
Box 25: Enter Federal Tax ID. Check the right box: Provider’s EIN or SSN.
Box 26: Patient’s account number assigned by the accounting system.
Box 27: Accept assignment? Usually “Yes.”
Box 28: Total charge for the entire claim.
Box 29: Amount paid (if any) by the patient.
Box 30: Leave blank (no longer used).
Box 31: Signature of provider or “Signature on file.”
Box 32 & 32a: Service facility location and NPI.
Box 33 & 33a: Billing provider info and NPI.
How Can You Avoid CMS-1500 Claim Denials?
A claim can be simply submitted if done accurately but a little mistake can make it a frustrating delay.
Double-Check the Following:
- Correct patient and policy info: Always verify insurance before the visit.
- Match CPT and ICD codes: Don’t code a procedure without an appropriate diagnosis.
- Use modifiers properly: Especially for things like multiple procedures or services.
- Don’t forget NPI numbers: These are mandatory for billing.
- Submit in red ink only: The CMS-1500 must be printed in red OCR ink to be scanned properly.
When Should You Use the CMS-1500 vs UB-04?
There is a clear difference between CMS-1500 and UB-04.
- CMS-1500: For outpatient services by individual providers or group practices.
- UB-04 (CMS-1450): For hospital billing and inpatient claims.
If you’re billing for an office visit, therapy session, lab work done in a clinic, or even telehealth services, stick with the CMS-1500.
Digital CMS-1500 vs. Paper 837P
Can we submit the CMS-1500 in digital form? This question must be in your mind, so the answer is yes, you can now submit these electronically through 837P files. It’s faster, more efficient, and often gets processed quicker. It’s sent through clearinghouses or directly to payers via Electronic Data Interchange (EDI).
But if you are still submitting paper forms, make sure you’re using the original red-ink CMS-1500 forms—not a copy. Copies won’t scan and will likely get rejected. CMS-1500 is an old version, still accepted but slower and more prone to human error.
Both forms contain the same information—diagnosis codes, CPT codes, NPI numbers, patient info, etc. But with the 837P, you don’t need to worry about smudged ink or slow mail delivery.
Why Most Providers Are Switching to Electronic Claims
The main reason behind this is speed and accuracy.
- Faster reimbursement: E-claims are usually processed in days, not weeks.
- Fewer rejections: Systems can catch issues like a missing NPI before submission.
- Better tracking: You get immediate confirmation that your claim was received.
- Time savings: No printing, no envelopes, no stamps.
But remember that CMS-1500 paper claims are still perfectly acceptable, especially if you’re a small practice or working with a payer that doesn’t accept electronic submissions yet.
Common CMS-1500 Mistakes and How to Avoid Them
Professionals can also make mistakes but these mistakes can be avoided by keeping simple things in mind.
- Using the wrong diagnosis pointer (Box 24E): Always link to the correct ICD-10 code.
- Incorrect place of service (Box 24B): Don’t guess. Get the exact POS code from CMS.
- Not updating provider info: NPIs, addresses, and contact info must be current.
- Overlooking Box 33 details: If your billing provider info is wrong, then payment can be delayed or missed.
- Forgetting required modifiers: Some CPT codes need them to be payable, like -25 and -59.